Sunday, November 30, 2008

My Little Buttercup

Here is my case of the Featured stamper today flowergal36, where I cased this card of hers. I really do love that set too, and don't often bring it out. I also loved that fact that she was giving her card to her daughter as an encouragment...so...I took that idea too and will give this to my daughter. She's been doing so well in Junior High and had an outstanding report card on Friday. I want her to know again that we're proud of her not just for the work on the report card, but for who she's becoming....she'll always be my little buttercup :)


Changes to Dawn's card: layout is slightly different and works for Jen's Sketch for You to Try. I changed the colors slightly from Rose Red, to Real Red and added white pencil crayon around specific areas and the edges and brads as accent, and used the wheel instead of the main stamp as my background.


So sweet and simple. My camera battery just died so I have no closeup...but you get the idea!


Recipe: Together Forever, Forever Flowers Wheel, So Many Sayings Ink: Real Red, Basic Black Paper: Real Red, Kraft, Basic Black Accessories: Wide Grossgrain Ribbon, Circle Punch, White pencil crayon, Brads, Dimensionals, Stampin Write Marker

Saturday, November 29, 2008

Christmas Wrapping!

Well, I'd love to be at the stage of already wrapping my presents...but you'd have to have bought them already then right? In my heart I desire to be an early Christmas shopper, done by Dec 1...but in reality it never happens!

The IC challenge over at Splitcoast is some really cute wrapping paper, three different versions. I have this adorable new set that I've been looking at in the catalogue for so long...I think it's so cute and always usuable....it's ready for every season!


The image is stamped on watercolor paper and watercolored with reinkers and SW markers, it's tiny so it's delicate work. I accented the bird's beak and the poinsettia centers with some Gold Zig Painty. I also paper pieced the planter pot with some of the other great papers from this DSP. They are so rich!
Some new ribbon from the Holiday Mini. And I really love how the sentiment banner turned out too. The card looked like it was missing something so I added a line of piercing around the focal image and added Zig Painty as accent...it was the right touch.


Recipe: A Flower for All Seasons, Many Merry Messages Ink: Black Stazon, VersaMark Paper: Riding Hood Red, Old Olive, Holiday Treasures DSP, Watercolor Paper Accessories: Circle Punches, Ribbon, Gold Brads, Ticket Corner Punch, Dimensionals, Reinkers, SW Markers.


Friday, November 28, 2008

Flourishes Friday - A Special Birthday

Since I first saw this Flourishes Poinsettia and Boxwood stamp set...I've been dreaming of creating a card like this! Have you ever seen the creamy white poinsettias at Christmas? They have a green tinge to them and they look so beautiful...so that's where the idea for this card came in.

As well this card is a special birthday card for a dear friend of mine who's Birthday it is tomorrow. She is a friend that I never expected to find! She is a woman of warmth, kindness, faith and a genuine heart for others. She prays for me, and I for her. We've had some really amazing deep conversations. She is also immensely talented and inspires me to hone my craft and continue to create beautiful things...because she is always creating beautiful things. Her favourite color is green too. And ...we've never met in person! We've come to know each other through this crazy wonderful world of stamping, and Splitcoast stampers. And I'm blessed to know her. So Happy Birthday Jerri! You're getting a sort of preview of your card...which will follow across the continent a little late!


Here I stamped this gorgeous large Poinsettia 3 times and watercolored it with SW markers and an aqua painter. Because I was also trying to create that white/cream look to the flowers I also painted a light wash of Lumiere on the petals. It just shimmers in real life. I placed the 3 layers together with dimensionals between each section. I added darker green leaves behind the poinsettia as well. Mounted on ovals cut with my colluzzle that were also sponged. Here is a better picture of the shimmer. Imagine it even more shimmery IRL!


The patterned paper is Basic Grey Mistletoe and Pear and the Rhinestones are K & Company.

What a gorgeous set isn't it? Thanks for stopping by!

Please check out the other Flourish Friday contributors: Cindy Haffner, Becca Fekkan, Betty Wright and the Friday round-up on the Flourishes Newsletter
Recipe: Flourishes - Poinsettia and Boxwood, Ink: VersaMark, Certainly Celery, Always Artichoke Paper: Certainly Celery, Always Artichoke, Whisper White, Watercolor Paper Accessories: White Taffeta Ribbon, Gold Cording, K & Co Rhinestones, Dimensionals, SW Markers, Aqua Painter.

Wednesday, November 26, 2008

Glitter on the Tree

Oh my kids are begging us to set up the tree...but we have such a busy week that it will have to wait maybe till Saturday at the earliest. They're so excited to pull out all the ornaments and remember when we first had them, I have a lot of picture ornaments too of them when they were tiny, we all ooooh and awwww when we see them. There's something magical about setting up the tree, always has been that way for me.

I received BRAND NEW sets today....Yippee Me!!! All kinds of new Flourishes sets. So, tonight after I had completed cutting 240 cards for a Stamp A Stack I'm doing tomorrow, I just had to make a quick card with one of the new sets...it just beckoned me!

This is a gorgeous Flourishes set called All That Glitters and it's full of old fashioned ornaments and pine branches. These are the kind of ornaments I grew up with, so it really is set with special connections for me.


I took the pink branch and inked it in Baja Breeze and stamped them to give the feel of a Christmas tree. Then I stamped the pine cone ornament in Basic Grey and a 2nd one on a separate sheet of Whisper White and cut that one out and added it with dimensionals. They are lightly watercolored with Baja Breeze, then highlighted with my silver Zig painty and then the pretty part...I added sections of Crystal Effects to the ornament to give it dimension and to some of the tree branches and covered it with glitter and let it dry. It has gorgeous sparkle and dimension in real life. It doesn't look as random as the photo looks. Cameras always pick up the stray glitter don't they? Like my new OTT light? $50 off at Michaels!

The background is layers of Basic Gray, Baja Breeze, and Ski Slope DSP and a layer of vellum. Some more Zig Painty for silver accents, and grey taffeta and silver cording.

The sentiment is from the Poinsettia and Boxwood set and behind it is another layer of vellum lined with the Zig Painty. Here you can see a little better the dimension and the glitter.


What a gorgeous set! I'm going to love it!

Recipe: Stamps: Flourishes - All that Glitters, Poinsettia and Boxwood Ink: Baja Breeze, Basic Gray Paper: Basic Gray, Baja Breeze, Ski Slope, Cardstock Vellum, Whisper White Accessories: Basic Gray Taffeta Ribbon, Silver Cording, Rectangle Punch, Crystal Effects, Zig Painty, Dazzling Diamonds, Circle Punches, Dimensionals, Reinkers, Aqua Painter, Silver Brads, Scallop Edge Punch, Baja Breeze Wide Grosgrain Ribbon.


Brayering Club Cards

Last night I taught brayering techniques to my stamp club. It was a fun night of wrist action! Here are the results!

This one is my favourite:

Night Sky


This card uses the brayered sky technique. I really love how the blues look in deepening colora against the crisp white of the snow.

First the house is stamped in Basic Black, and then we tore a mask out of Sticky Notes to create the bottom third of snow beneath the house. Then we brayered Bashful Blue, Brocade Blue and Night of Navy in layers on the sky adding less of the darker colors so the house almost radiates light.

After tearing off the mask then white gel pen was added to the house on the snow areas and in the sky for stars.

A pretty ribbon treatment and sentiment labels....voila! Gorgeous!


Purple Elegance


This was a case of a card I saw by annascreations using brayering and an acetate card. Such a pretty look. We changed it up a little and used purples. We created our own *spectrum* ink pad with reinkers and baby wipes and added rows of reinker color moving from lighter to darker and rolled the brayer in it and brayered it on the Whisper White.

The acetate layer is stamped with White Stazon and the sentiment is inked in the baby wipe pad to give it some variation of color.


Faux Metal Ornament


I saw a cute ornament card by amykennedy that I thought would make a great gift tag or card or even a cute ornament for the tree, and I also saw JanTink do some amazing faux metal brayering, so I combined these two ideas into this card.
The ornament is cut out of Rose Red with the Coluzzle, and the Round Tab punch is the topper. Stamping with Season of Joy.

The faux metal section is done by embossing Silver EP on metallic silver cardstock, let cool and then brayer over top with the sponge attachement in Rose Red. The embossed sections raise up and don't take the ink, the flat sections have this pretty metallic Rose Red look. Cool hey???
Happy Thanksgiving to my American Friends! I'm thankful for you!
Recipe:
Night Sky: Stamps; To You and Yours Ink: Basic Black, Bashful Blue, Brocade Blue, Night of Navy Paper: Bashful Blue, Basic Black, Whisper White Accessories: Brayer, White Gel Pen, Sticky Notes, Silver Brads, White Grossgrain Ribbon, Dimensionals, Oval Punch, Designer Label Punch
Purple Elegance: Stamps: Scandinavian Season, Punches Three Ink: White Stazon Paper: Whisper White, Almost Amethyst, Lovely Lilac, Acetate, Elegant Eggplant Accessories: Jumbo Eyelets, Cropadile, Elegant Eggplant Grossgrain Ribbon, Baby Wipes, Reinkers, Brayer


Faux Metal Ornament: Stamps: Season of Joy Ink: White Craft, Rose Red, Silver Encore Pad, VersaMark Paper: Rose Red, Silver Metallic, Whisper White Accessories: Round Tab Punch, Basic Gray Taffeta Ribbon, Oval Punches, Silver EP, Sponge Brayer, Rectangle Slit Punch


Monday, November 24, 2008

Toonie Tuesday - All About Men!


It's my sweetie's birthday today. How I love that man. He is that rare blend of deep faith in God, strength, integrity and determination, mixed with tenderness, a protective heart and rich laughter, and then on top sprinkle some major snoring and a *different level of clean* from me (that's what he always says...but you can interpret that... :) ) It's a wonderful package!

God has blessed me so richly with him to share my life with.

So this is his birthday card. For the first time ever, I inked my Thomas Kinkade stamp. They are just incredibly gorgeous stamps...and so detailed...but I'll be honest they are a bear to color! There is so much tiny detail and shading (he is called the Master of Light)....that you really need to LOVE someone to do a card like this for them. (I say that because I know he's reading this). It took me a good 2 hours to color. See how much I love you honey???


I stamped with Pallette Noir Ink on Whisper White and colored with Prismacolor pencils and Gamsol and a blender. It takes time, patience and layering of color. I don't think I'm a real master at Prismacolors yet....I like them, but like everything else you need to practise at it.

I wanted to create more of a fall scene with autumn rather than spring colors. So you can see the more fall colors.

I've stamped the Not Quite Navy layer with Linen, and lots of sponging, then added the rust to bring out the color and contrast in the design. I've added felt ribbon and brads for accent and made the sentiment as a small banner.


Sample Two:

The color challenge colors today remind me so much of a man's suit. Grey flannel suit, Rust accents...a Vanilla colored crisp shirt, so I went with it creating a really mens' wear inspired Christmas card.


I've used Winter Post and embossed my deer on Really Rust with Clear EP as my focal piece, I've given it a "mens' wear tie" and tie tack with the ribbon and layered it on the base of snowflakes with lots of sponging for added warmth.

Lots of metal accents, tailored corners...I really love the feel of it!


Recipe: Sample One: Stamps: Thomas Kinkade - Streams of Living Water, SU All Holidays (sentiment) Ink: Palette Noir, Not Quite Navy, Chocolate Chip Paper: Not Quite Navy, Really Rust, Chocolate Chip, Whisper White Accessories: Prismacolor Pencils, Gamsol, Blender, Antique Brads, Dimensionals, Felt Ribbon, SW Marker, Sponge


Sample Two: Mens' Wear Christmas - Stamps: SU Winter Post Ink: VersaMark, Basic Gray, Vanilla Craft, Really Rust Paper: Really Rust, Very Vanilla, Prestwick DSP, Basic Gray Accessories: Stylized Silver HPH, Old Vintage Brads, Circle Punch, Basic Gray Taffeta Ribbon, Dimensionals, Clear EP, Ticket Corner Punch, Sponge.

Sunday, November 23, 2008

Sweet Bella Jalene

I had an email conversation today with one of my girls ... she is one of our High School Graduates we've worked with that got married this fall to one of our other graduates I posted pictures of their wedding and the gift I made them back in October here.

They are serving at a ministry in Scotland this year...I'm so proud of them, but sure miss them too...I wanted to send a card to her to remind her again how precious she is. Bella means beautiful in Italian right? She is beautiful inside and out. I always describe her as rare.


So...this is headed to Scotland....

I wasn't a fan of this set at first glance, till I saw THIS CARD made by Mary Jo Albright. Oh my WORD! It's no wonder she's a two-time Stampin' Up! Artisan award winner, and Dirty Dozen girl. She's amazingly talented.

This flower begs to be showcased, so I stamped it in many layers and used my sponge dauber to sponge extra color directly on the stamp and then after onto the pieces that were cut out. It really gives it dimension. The larger flower center is embossed in white and then daubered all over with Blue Bayou. Each layer out is bent lightly to round it and then mounted with dimensionals. These are last springs' Afternoon Tea Designer papers, how pretty aren't they?


This sketch is Jen Del Muro's Sketch for You To Try...what a great sketch isn't it? I so rarely "tilt" card elements, but it just gives it a WOW layout!
Recipe: Bella Blossoms Ink: Soft Sky, Baja Breeze, Blue Bayou, Wild Wasabi, Garden Green, White Craft Paper: Soft Sky, Whisper White, Afternoon Tea DSP Accessories: Sponge Daubers, Dimensionals, White EP, 1/2 Pearls (Pretties Kit), Soft Sky DS Ribbon.

Saturday, November 22, 2008

Sweet White Bella

Ok...I'm breaking my Christmas card tradition....but I have a new stamp set...so it's like an obligation to use it :)


I checked out the Featured Stamper tonight....it's ebethneu , who has wonderful style. I was looking for something to case and loved this card, it uses a different set, but I knew that my new set could make it happen in a similar way. I liked the embossing and the simplicity of the layout.


Changes: Set, sentiment, ribbon, use of HodgePodge Hardware, Sponging, added different layers

Kept: Basic color palette and layout and style of card.


I embossed the larger Bella flower on the Bella DSP and embossed with Winter White. I also embossed the sentiment too. I sponged the edges well and added some pretty piercing.


I overstamped the smaller flower on the Kiwi Kiss layer and used a different type of HodgePodge Hardware in a different way.


Gorgeous stamp set don't you think?
Recipe: Stamps: Bella Blossom; Ink: Craft White, Kiwi Kiss and Riding Hood Red; Paper: Bella DSP, Kiwi Kiss, White, Riding Hood Red Accessories: Oval Punches, Winter White EP, Kiwi Kiss Satin Ribbon, RHR Taffeta Ribbon, Silver Ribbon Slide & Brads, Piercer, Dimensionals

Friday, November 21, 2008

Flourishes Friday - Christmas Cocoaliscious!


Hee hee....I love my little rhyme!


I am anxiously awaiting my Flourishes Christmas sets....they have not yet arrived, so for today's Flourishes Friday I had to be creative in my Christmas Card Craziness. And doesn't a nice warm cup of hot cocoa have a Christmas feel to you? So I grabbed my Coffee with Friends set!

I stamped the large latte cup in Brown Stazon on watercolor paper and watercolored it with a Close to Cocoa SW Marker on the top of the cup, left a white section around the flourish I had added in the middle, and then watercolored the bottom with a Chocolate Chip SW Marker. I went back and added a mix of cocoa and Barely Banana for the middle section to match the DSP.

I love these vintage/victorian feeling papers that are retired SU. They almost have the feeling of wallpaper or a fancy dish set, so I tried to incorporate both feelings into the design, with the DP's and with lots of sponging to continue that old world feel.

I added felt ribbon to give it some cozy feel, like that warm cocoa is sinking in. And a little stamping of the swirly steam behind the cup.

The sentiment is made with the rectangle stamper from Just Rite and the Brayton font. And vintage brads for the finishing touch.


Be sure to stop by the other Flourishes Design Team girls blogs and the Flourishes blog for a peek at their great creations. Cindy Haffner, Becca Fekkan, Betty Wright ...... Flourishes Newsletter, and I know Laura will probably have one too since she started theFlourishes Friday idea in the first place!


Stamps: Flourishes: Coffee With Friends; Ink: Brown Stazon, River Rock, Barely Banana, Chocolate Chip Paper: Chocolate Chip, River Rock, Watercolor, Barely Banana, Brocade Basics DSP Accessories: Sponge, SW Markers, Word Window Punch, Felt Ribbon, Large Circle Punch, Vintage Brads, Dimensionals.

Thursday, November 20, 2008

Dirty Dozen Challenge - Thankful Hearts

Just a week from now is American Thanksgiving. With my husband and kids being dualies, we often still celebrate both Thanksgivings (yum extra mashed potatoes!). But this month's Dirty Dozen (present and alumni) challenge is a focus on Thanksgiving or Thankful projects. No restricted items....required element a heart! Be sure to check out the other DD girls projects at Splitcoast here , or by searching DCTH1108.


So I created a thank-you card for our Piano teacher. I am so grateful for her. She's just FUN, and creative and talented. She's the kind of woman that teaches the kids how to write their own music, has the kids put on a full costumed production in a theatre downtown every other year, has prizes and great music selection for them. They are learning so much. And love it enough that they practise and just play on their own for fun, just because they are learning and enjoying it.


So...seeing as one of the periods she is teaching the kids about in Piano is Baroque...here is my Baroque Copper Gratitude card for her.


It's good sometimes to get out the retired items isn't it? I found these gorgeous papers again when I was cleaning my stamp closet (I have like 3 packs!). I like them because the are definitely elegant and have almost a Christmasy feel too. All the layers are well sponged. Sponging is such an easy thing...and it always gives a richer effect to your paper.


I embossed the medallion swirls from Kind Thoughts in Copper on River Rock, trimming it out carefully and adding accent and color with my SW Markers. I took an old heart charm that was silver and inked it with VersaMark and dipped it in the Copper Embossing Powder to change it's color. I wanted to keep it a little vintage so I left a little of the silver showing in spots. Be careful if you ever do this, use the graspy prongy things (wow I'm so technical) from the tool kit and don't touch it after it's heated...it's hot! (there that's my legal disclaimer).


I also heat set the organdy ribbon a little to give it that curly look.

Recipe: Stamps: Kind Thoughts, With Gratitude Ink: VersaMark, Old Olive, Chocolate Chip Paper: Old Olive, Chocolate Chip, River Rock, Brocade Background DSP Accessories: Copper Embossing Powder, Green Organdy, Copper Cording, Copper Brads, Dimensionals, Piercer, Silver Charm, SW Markers, Scallop Edge Punch


Thanks for stopping by today!

Tuesday, November 18, 2008

Toonie Tuesday - Snowy Christmas

Hi again!

Two snowy samples for you today!


Sample One: Skating Sweethearts


Today's Color Challenge at SCS is a gorgeous one, Real Red, Basic Black and Kraft. I think there will be some stunning combinations! To me this really lends itself well to a vintage look, so I pulled out Winter Post. I stamped the skaters on Kraft and used my Prismacolor pencils to color them. Prismacolor pencils have a far waxy-er (how WOULD you spell that? waxier???) base so they blend really well on their own or also by adding a blending medium like Gamsol. I didn't use any medium because I wanted it to have a more old world texture. But I LOVE how white shows up on Kraft...white ink, white pencil. It's gorgeous! (the Prismacolor pencils are the only non-SU thing on here).

I've added fun embellishments, with the deer, the vintage Hodgepodge hardware, the gingham ribbon and felt snow flurry. Love love love this card. (are you that way...your most recent creation is your favourite!?)....


Sample Two: Shimmery Snowdrops


Flourishes has some pretty silhouette sets, and this one is called Spring Ephermerals. what is fun about silhouette type stamps is that you can not only use them in the silhouette fashion, but also as a surface to color in a more detailed way. Here I colored my *snowdrop* stamp with my SW markers direct to stamp, but used several colors, then stamped on Shimmer White paper. Then I went back over the image and gave it definition with my SW Markers and a white gel pen. It gives you an entirely different look.

I wanted to give this card the feeling of little flowers being surprised by the first snow...or peeking through the shimmery snow. So I added Crystal effects and Dazzling diamonds to the flowers (and drops of wet snow hanging), and also layered dimensional *snow*, with layers of paper and CE and Dazzling Diamonds.

The sentiment is done with my Just Rite stamps and the Brayton font. I love these stamps because you can customize them to say whatever you like! Some pretty rhinestones and taffeta ribbon for details. See...almost any stamp can be Christmasy!


Recipe: Sample One: Skating Sweethearts: Stamps: Winter Post, All Holidays Ink: Basic Black, White Kraft, Real Red, Sahara Sand Paper: Real Red, Basic Black, Real Red and Kraft Patterns DSP Accessories: Hodgepodge Hardware, Coluzzle Cutter, Dimensionals, Prismacolor Pencils, Gingham Ribbon, Felt Flurries, Piercer


Sample Two: Shimmering Snowdrops Stamps: Flourishes - Spring Ephemerals, Just Rite - Brayton Font Ink: Garden Green Paper: Garden Green, Certainly Celery, Shimmery White, Basic Grey - Mistletoe and Pear DSP Accessories: Rhinestone accents, White Taffeta Ribbon, Piercer, SW Markers, Just Rite Wooden Stamper, Crystal Effects, Dazzling Diamonds, Oval Punch

Saturday, November 15, 2008

Water Water Everywhere and Not a Drop to Drink...

What a last 18 hours we've had. Yesterday morning after the kids went to school I went downstairs and threw in a load of laundry and came upstairs. A few minutes later I heard a lot of noise downstairs and thought something had gone wrong with the washer, maybe one of the hoses had come loose...NOPE. Worse. I come down to a whole lot more noise....water gushing from the water heater all over the floor and the smell of gas. You guessed it, our water heater burst. I called my husband in a panic, shut the water and gas off and he came home. He was scheduled to leave with our High School students for a weekend retreat yesterday too, but he sent them off with our volunteers and stayed home an extra day to make sure everything was fixed. He's a good man.


So, we had to purchase a new water heater. I had no idea how expensive these were! We did get a much larger one, good for soon to be teens in the house, but the water heater alone was $900 not including installation, which we couldn't get till today (and weekend installation is more expensive just in case you were wondering!). So, because one of the lines was still leaking we had to shut off the water to the house. It really puts a cramp into life!


But....I am grateful it didn't happen when no one was home, and it didn't happen say today when my husband would have been gone.


So...I can have a shower in a bit when the full tank has heated up! Yippee!


Alright...down to the creative.


Today's inspiration challenge at SCS is a really neat website of felt scarves and wraps called The Felted Garden. Here was my inspiration.


I have been wanting to make a special thank you gift for the family that let us stay in their house in the mountains for my birthday. I wanted to make them a gift set of Christmas cards, like the tutorial that Beate recently did. Our friends like classic simple design so I used To You and Yours for some pretty Christmas cards.


Here is the entire ensemble:


Here is the boxed set and card I'll write in for them. The scoring lines are made with my Scor it tool.


The box closeup. It holds 12 cards and envelopes. The finished lid is also sponged to give it more warmth and the tag is embossed with the swirls from the dove.


And the gift cards. Here the dove was embossed, the top section embossed with the Scor It, and the flourishes are stamped in VersaMark and then Aztec Gold Pearlex is swept over the stamping to give it a golden shimmer.


A very pretty set, and practical!


Recipe: Baroque Motifs, To You and Yours, All Holidays Ink: VersaMark, Ruby Red , Gold Encore Ink Pad Paper: Very Vanilla, Ruby Red, Ginger Blossom DSP Accessories: Oval Punches, Aztec Gold Pearlex, Vanilla Taffeta Ribbon, Riding Hood Red Taffeta Ribbon, Gold Cording, Scor It, Zig Painty Pen, Gold Brads, Dimensionals, Piercer, Scallop Edge Punch, Coluzzle, Sticky Strip, Sponge

Friday, November 14, 2008

Flourishes Friday - Festive Christmas Topiary

Here we are at the end of another week! Only 6 weeks from yesterday till Christmas. Can you believe it? Any Christmas shopping done? NONE here...I'm just not even there yet.

But I've been making Christmas cards like crazy...and I think it's a great opportunity to look at your stamps in a new way, how can you use a non-Christmas stamp in a new way to give it a Christmas feel?

A lot of it comes down to paper and color choice, and rich embellishments for me if it isn't an obvious Christmas stamp.


This gorgeous Topiary stamp from the Siberian Iris set can absolutely have a festive Christmas look. I began with Basic Grey Mistletoe and Pear designer paper. The plaid pattern in these traditional colors is so great. And doesn't a plaid look so much more interesting on the diagonal?

I also used Prism papers for perfect color matching. I stamped the pretty flourish on the background, and on the sentiment ornament. I stamped the Topiary in Stazon on watercolor paper and colored with reinkers and SW Markers, even giving it a shadow effect. I didn't have a sentiment that would work for me so I wrote festive in a gold pen (Creative Memories I think).


Be sure to stop by my Flourish friend and DT member Cindy Lawrence 's blog...she has wonderful Flourishes blog candy...you don't want to miss it because it includes NEWLY released stamps!

And be sure to check out the other talented Friends of Flourishes Blog Team members have put together for today: Cindy Haffner, Becca Fekkan, Betty Wright and the Friday round-up on the Flourishes Newsletter


Recipe: Stamps: Flourishes Siberian Iris Ink: Black Stazon, Old Olive Paper: Prism Papers: Classic Red, Birchtone Dark, Spring Willow Medium, Watercolor Paper, Basic Grey: Mistletoe and Pear Accessories: Reinkers, SW Markers, Slit Punch, Rhinestone Brad, Circle Punch, 1/16 punch, Chocolate Taffeta Ribbon, Kiwi Kiss Satin Ribbon, Gold Cording, Gold Pen, Dimensionals.

Thursday, November 13, 2008

Hope Angel

Hello Everyone!


Well today's Ways to Use it Challenge over at SCS was to use watercolor paper, well sheesh...there is nothing you could ask for that would make me happier! Watercoloring is something that brings me a lot of joy.


So, even though I have other things I'm working on today, I had to steal a few minutes to watercolor this angel from Holy Triptych. I really do love these K & Co designer papers and they were my jumping off point for the coloring.


Angel is embossed in Gold, and watercolored with Stampin' Write markers (colors: Taken with Teal, Not Quite Navy, Certainly Celery, Barely Banana, Creamy Caramel, Blush Blossom). And then I added a pretty wash in the two corners. I wanted to make the most of the pretty DP, so I added photo corners and the sentiment embossed in gold on the DP as well. The edges of the card are also rimmed with the Teal SW marker and then brushed through a Gold Encore stamp pad.


I've been really busy this week. My mom came over on Rememberance Day (Veteran's Day for Americans) and we made about 160 - 180 Pyrogies, and also about 6 dozen shortbread cookies.

Here is the fruit of our labour :) There's my mom panning them from the water to the frying pan.

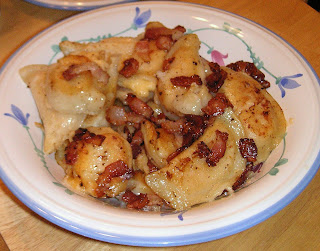
Pyrogies if you didn't know are a Ukranian food, we're not of Ukrainian descent, but we appreciate the food! In North Dakota I heard something similar to it called cheese buttons. Really its a dough you mix, roll out and cut into circles then fill with a mashed potato, cheese & onion blend of yumminess, then pinch the sides together to seal it all in. Then you freeze the pyrogies till you need them. We made them for supper that night with Roast Chicken, first you boil them till they rise, then fry them with bacon. GASP they are sooooooo good! Serve with a dollup of sour cream and it's food heaven on earth!


Yesterday I cleaned my stamp closet. It was a disaster. I have issues. Issues with paper and with embellishments (like ribbon). In that I love them, and need better organization. And I need more time to put things away. I don't have a dedicated space to stamp. But I have a large cupboard from Ikea (3 sections wide) that is in our room, then I bring things out to the kitchen table to stamp. Usually not everything gets put away..... you get the picture.


But organizing yesterday felt so good. Everything is sorted, put away, reorganized, purged. How can I have collected 5 containers of Dazzling Diamonds!! It really helps you know what you have when you know where everything is.


Felt good :)


Recipe: Stamps: Holy Triptych, So Many Sayings Ink: VersaMark Paper: Taken with Teal, Certainly Celery, Watercolor, K & Company Christmas Cheer DP Accessories: Gold EP, SW Markers, Velvet Ribbon (Flirty), Oval Punches, Gold Brad, K & Co Christmas Cheer Ornaments, Photo Corner Punch, Gold Cording, Dimensionals

Tuesday, November 11, 2008

Toonie Tuesday - A Cup of Christmas

....We will not forget! - Remembering November 11


Well, since my 1st sample was uploaded last night for the color challenge, this is the 2nd one :)

My challenge to myself right now is to see how many Christmas cards I can make one at a time....another challenge is to see how you can make any card a Christmas card !


I actually had the inspiration to make this card way back in summer. We were in the mountains at our friends home and I was getting a cup out of the cupboard and saw this pretty china cup with flowers trailing on it. I said hmmm...I could create that with a stamp!

So here is a unique combination of 2 Flourishes stamps, Coffee with Friends and Lilac. I stamped the cup from Coffee with Friends and the stamped the smaller magnolia over the cup as if it were part of the design. I watercolored with Reinkers and the added Lumiere over the white parts of the cup to create the feeling of it being a porcelain or china cup. Then added a lighter wash over the flowers. It's so pretty IRL!


By using the Christmas papers from SU's Holiday Treasures, and pretty accents - you give the card a very Christmas feel.

Thanks for dropping by today!

Stamps: Flourishes Coffee with Friends, Lilac Set Ink: Black Stazon, Chocolate Chip Paper: Chocolate Chip, Kiwi Kiss, Holiday Treasures, watercolor paper Accessories: Coluzzle, Reinkers, Lumiere, RH Red Taffeta Ribbon, Vanilla Taffeta Ribbon, 1/2 Pearls, Hodgepodge Hardware (Pewter)

Monday, November 10, 2008

Hosting the Color Challenge!

Tonight Emily our fearless Color Challenge Hostess is under the weather so she asked me to host Tuesday's Color Challenge. I was so excited...then I realized hmm....I have to choose the colors! Yikes! And since we're on Challenge 192...there's a lot to make sure you're not duplicating!

So...I decided that since we've not used Pacific Point much, we'd throw that in with Basic Gray and Certainly Celery.

Here is my sample:


I stamped in Stazon on watercolor paper and watercolored with Reinkers and SW Markers, I also added Lumiere to the snow and tree to give it shimmer. It really doesn't photograph, but it has a pretty shine to it all. Here is a closeup of the shimmer - I wish it showed better. I also used Shimmer White for the sentiment and mounting.

Thanks for looking!

Back tomorrow with another card!

Recipe: Stamps: Home for Christmas, Winter Post (snowflake) Paper: Pacific Point, Certainly Celery Prints, Urban Garden DSP, Watercolor, Shimmer White Ink: Black Stazon, Pacific Point, Basic Gray Accessories: Ticket Corner Punch, Stylized Silver HPH, Dimensionals, White Gel Pen, Silver Stretchy cording, Piercer, Reinkers, SW Markers

Saturday, November 8, 2008

Peaceful Christmas

Today I was working on a design for a Stamp A Stack I am doing and realized...yikes I have a swap due on Tuesday ... so I waited till Beth announced the Featured Stamper tonight (Wendybell) and scoped her wonderful gallery for a design I could use for these swaps next week. She's so talented and uses color and dimension so well.

So here is my design based on this one of hers

I liked a number of elements which I kept the same...her layout, the use of the ribbon, how she created her own *background paper* with stamps. I changed the color scheme, stamps, added piercing and brads.

My *background* paper is really more of a shadow stamping of the house tone on tone in River Rock with the white gel pen as accent. I dug out all the InColors from last year. It was so fun to play with them again.


And, as I was working on my earlier design today our 9 year old son said, "Mom, can I make a card?". This is actually pretty rare for him, so I said, sure! He used this same To You and Yours set ... well, cause I had it out...and cause it's new and ...you just have to use what's new right? :)


Didn't he do a great job? He picked his own colors, and distressed the edges himself. He gave it to his good friend across the street already (gasp...he GIVES his cards away??? What's that about?! :) ...actually I'm getting better at that.

Recipe: Stamps: To You and Yours Paper: Purely Pomegranate, River Rock, Always Artichoke, Holiday Harmony DSP, Whisper White Ink: Purely Pomegranate, River Rock Accessories: Satin Ribbon, Brads, Piercer, Scallop Edge Punch, 1 3/4 Circle Punch, Dimensionals, White Gel pen.


Friday, November 7, 2008

Funky Coat Christmas


Apparently this is my day for stamping....and in colors I don't usually use!

I came home tonight just in time to see the Inspiration Challenge at SCS. It's a link to a clothing company in the US called Boden (which by the way means soil in German, just in case you needed to know that).

Here's the picture that called to me....


It's such an unusual color combo...but a lot of kids clothes are inspirational like that. I like the winter feel, the trees in the background, her cute hat and scarf and the great teal lining to the coat (it has cute toggles and buttons too).

So here is my Christmas rendition. I broke out Season of Joy because it has this sort of fun funky feel to it. The sketch is Beate's weekend sketch challenge, and I've used old and new DSP's and pretty teal velvet ribbon and a pretty rhinestone brad.


There ya go...no more stamping for ME tonight! Have a great weekend!

Stamps: Season of Joy Ink: Taken with Teal, Kiwi Kiss, Regal Rose Paper; Kiwi Kiss, Kiwi Kiss Patterns DSP, Taken with Teal, Loves Me DSP, Regal Rose, Whisper White Accessories: Dimensionals, SW Markers, Circle Punches, Teal Velvet Ribbon (Flirty), Rhinestone Brad, Piercer

All Is Well

Last night I found some fabulous paper by K & Company called Christmas Cheer...it's yummy, double sided and with texture too. The colors inspired me to do a Christmas design for the Limited Supply Challenge at SCS, using shapes, Rectangle and Circle and the only embellishment ribbon. Really an unusual color combination isn't it...but the DP makes it work.


I embossed and watercolored Mary Joseph and Baby Jesus with SW Markers and reinkers (...just as an aside, when our oldest daughter was tiny she would LOVE to play with the Nativity scene we had...she called Joseph....Jofas and she thought Baby Jesus was adorable...but she called the baby a *she*...(theologically a little incorrect! :) ) but she was so darn adorable when she'd say "oh there's Baby Jesus...she's so cute!")

Anyway....I also stamped the image with Stazon on Vanilla and sponged Taken with Teal on it and then mounted the watercolored cut out image on top. (much like my previous Lilac post).

I added Dazzling Diamonds with Mono Multi and topped it off with fabulous satin ribbon. Want to know where it came from? My dear friend Jerri! She sent me this amazing package for my birthday from Bath and Body Works and it was all tied up with this fabulous double sided red and burgundy ribbon. Stunning. And she's a wonderful friend too, not just because she gives me nice gifts :)....but because she's has a beautiful genuine heart.

My husband bought us a new Christmas CD by Casting Crowns...one of my absolute FAVOURITE groups, they have such wonderful songs and lyrics, and they are also youth pastors. We love them....anyway...a song on the CD is called All Is Well, it is beautiful! Truly all is well because of our Saviour. No matter what *isn't well* in the world or your circumstances ...He can make your heart know with confidence *all is well*... here are some of the lyrics I can remember...

"Here's the Saviour of the world tonight
In our humble hearts He will dwell...

God is with us, God is for us...God is with us all is well!"

Blessings on your day....good news too...my friend Laurie's daughter is coming home with them today to wait for the swelling to go down in her brain so they can do a biopsy. Hard to wait the next weeks...but happy they can go home for a while and know she is not at immediate risk. Your continued prayers for them are appreciated!

Recipe: Holy Triptych Paper: Bravo Burgundy, Taken with Teal, K & Company DSP, Watercolor, Vanilla, Satin Ribbon, Reinkers, SW Markers, Circle Punches, Dazzling Diamonds, Mono Multi Glue, Dimensionals, Gold EP