Saturday, March 30, 2013

Photography 52 - 13

Easter Blessings to each of you!  On Easter morning in our Church we say to one another "He is Risen!"  and the other person replies "He is Risen indeed!" And I am forever grateful.   My life knows hope because of my risen Saviour.


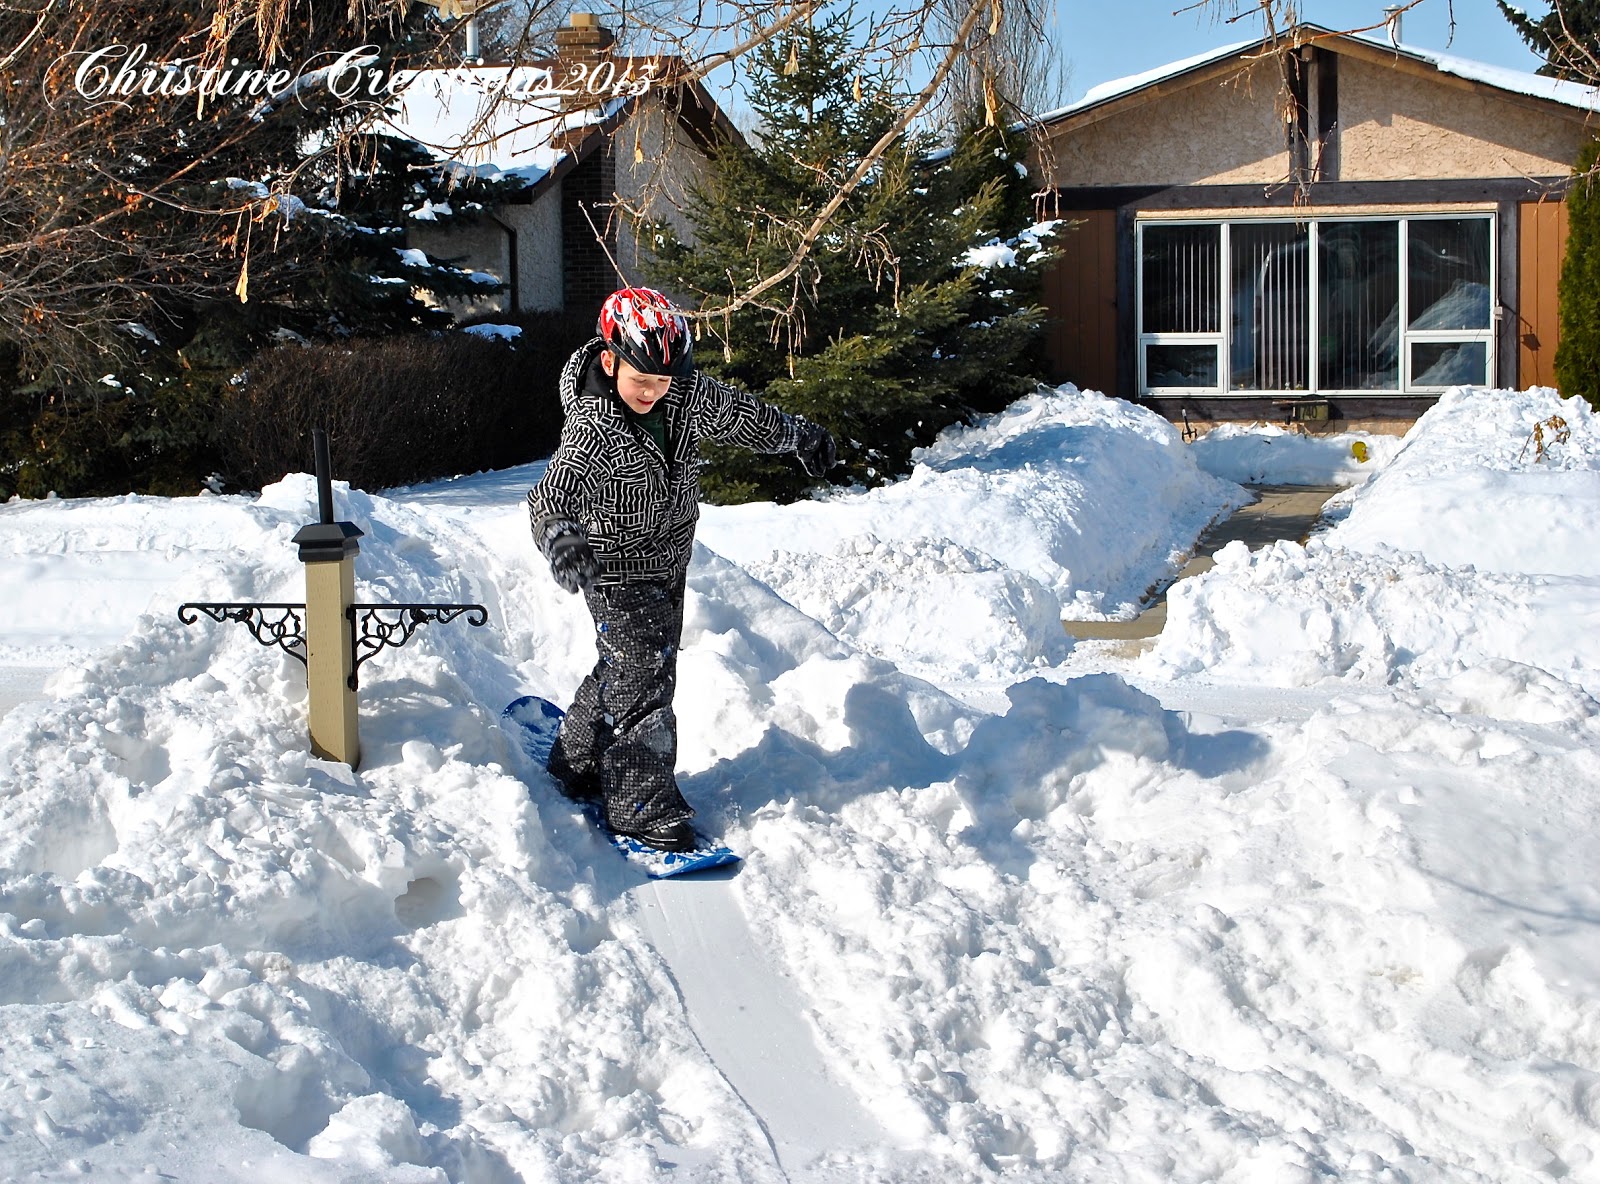
As I said earlier this week it was Spring Break for the kids and they had a great week doing all sorts of fun things with friends and with each other.  Our youngest decided to take advantage of the wonderful warm weather we had each day to make his own snow boarding hill in our front yard from all the snow we've had this winter.  Our neighbour gave him this little mini snowboard that doesn't have straps, you just step on and go.  Perfect!  He had SO much fun.  The weather was so warm that now a good portion of the snow is melted...so it won't be much longer and his hill is gone.  


He spent hours of fun outside this week!  It was a delight to watch. 


When our daughter had 4 of her friends over for a sleepover my husband found a fun mini cinnamon buns with maple icing recipe and made these for the girls for brunch.  He's the brunch king in our family.  They were really yummy.  Almost like a cinnamon bun cookie.  

Last week a number of you asked for the recipe for the Pizza Pasta and here's a link.  


This was this little guy's first year decorating Easter Eggs.  He was funny....


And very tuckered without a long nap that day....he didn't last long :)


But the rest of us had fun!  See my ombre Easter Egg?  


A small selection of some of the eggs we decorated.  

I hope you have a wonderful meaningful day today, wherever you are and whoever you're with.  Thanks for visiting!  

Thursday, March 28, 2013

Hyacinth


Hello Gang!  How's your week going?  We've been on Spring Break and the kids have had a good time with friends, sleepovers, playing outside in the snow because the weather has turned warm, a little shopping...all good stuff.  Today at Flourishes the team is showing off a beautiful Spring Set from our collection - Hello Hyacinth.  They make such a spectacular statement, and I love the variety of colours they come in.  And, want to know another fun fact? Flourishes recently added a Silhouette Cut File to match this set that you can find HERE!


I began by stamping the beautiful rooted hyacinth bulb on to Flourishes Classic Ivory with Memento Tuxedo Black ink, then trimming it "out of the box" style on the upper right and die cutting it with this gorgeous Radiant Rectangles Die from Spellbinders.  I coloured it up with Copics using pointillism to give the shadowed effect around the scene - still one of my favourite ways to get that soft and dreamy look.  I also used the Radiant Rectangles Die to border our the edge of the design, pairing it with our Color Made Easy - Emerald Coast Cardstock.  


The designer papers are MME - Unforgettable and I added some Seam Binding from the Emerald Coast Line and you might just be ablet to see the little row of teal velvet too (on sale!), and some Prima Crystals - facted gems to accent.  


Here's the Copic Collections I used:

and BG93, BG96, BG99


Such a beautiful breath of spring!  Now you can head on over for more spring inspiration with this set and the rest of the Design Team....  Thanks for stopping by! Be sure to check back tomorrow on the Flourishes Blog for a major announcement -- one that could involve YOU! That's right! You'll just have to check back and see!
Blessings on this Good Friday to each of you!  

Wednesday, March 27, 2013

Glitter Lace

I have a very shimmery tutorial today on the Flourishes Blog on how to do this technique that I call Glitter Lace.    It's quick and easy and gives you a very WOW effect!  I made this for my parent's Anniversary just last weekend.  Hope you can stop on over!


Lawn Fawn Blog Hop!

Today the CardMaker Blog Team has joined forces with the Lawn Fawn gang and we've put together some fun for you!  I was so excited to have these cute stamps come to my door, they were really great to play with.  There's so much personality and whimsy in each of them, so thank you Lawn Fawn!  Don't forget...Lawn Fawn will be hosting a giveaway on their blog of a stamp set and a 6x6 pad of the winner's choice, so you can be part of the fun too!

I put together a couple of cards to show you with a new set from Lawn Fawn, Home Sweet Home.  They MUST have known how much I love birds and birdhouses, because I think this set was made for me!


EEE!  So cute right?  I made a graphic little number with the paper pieced birdhouse hanging on a birch tree limb for the new home owners.  The papers are Lawn Fawn Pink Lemonade Petite Pack (so cute!).  I picked some patterns that looked like shingles and thought that would be perfect for the little house.  I'm a big fan of pink and orange together too, especially for spring and summer.


Like my little shingled awning I made to go with the design?  The wee little heart is a Lawn Fawn Lawn Cuts die  - Hearts.  Then a little seam binding, a button and twine to finish it off.  


Now we have a wee little nest of birdies saying their thank you's.  I thought this would work great for a baby-gift thank you, or an any-day-old thank you :)  I stamped on Kraft cardstock and then coloured up the parts with Prismacolor pencils, popping up the nest and birdies.  


I just think they are so adorable!  I did a little paper piecing with the same Pink Lemonade pack on the  banner just to give it some definition, and then a wee bit of twine to accent.  

For some more Lawn Fawn fun on this Blog Hop head on over to see Lynnette Kauffman and she'll show you more!  Thanks for dropping by today!

Monday, March 25, 2013

Easter Alleluia


I could not let this Easter week go by without sharing something special.  And this gorgeous Cross from Flourishes He is Risen set is a powerful symbol of Easter and of hope for me.  I pulled out all my old papers looking for just the right ones...and I found these perfect ones from Kaiser - Sweet Nothings.  The background sheet looks just like sun rays peeking through the clouds from the top right and it was a perfect fit for the Resurrection, and the colours were perfect for this set.  

I stamped on Flourishes Classic Ivory with Memento Tuxedo Black, then colouried up the image with Copic Markers, trimming it out to have a bit of a border.  I added some embossing with the Fireflies folder behind the main image, and a corner punch to pair with this beautiful Spellbinders die (Radiant Rectangles).  I sewed the layers on, and then added some lovely embellishments, some pretty varigated ribbon in blue, some faceted gems, the sentiment stamped with Memento Summer Sky ink on our Flourishes Perfectly Pierced Classic Window Die, and some looped trim.  


Kaiser always has punch outs at the end of their paper packs with scallops or sentiment lables and they worked perfectly on this card inside and out as well.  


Easter Blessings to each of you friends.  I'll be back shortly! :)


Saturday, March 23, 2013

Photography 52 -12

I have some fun pictures to show you this week.


After Blizzard #1 - (we had second one this week too).  We have the kind of trampoline that can stay out all year, but when the snow gets too deep I have the kids shovel off the tramp so it doesn't get too heavy, so our older son is tossing it out the top.  See the drifts at the back of the fence?  That's a 6 foot fence too, and another 10 inches probably fell on Thursday.  


My little artist - Our youngest loves to stamp too, he'll often ask to pull out the supplies to create something, and since he's an experienced little guy with a blogger mom, he wanted to make sure I showed it to you too :)  I thought his little flags were so cheerful.  


Pizza Pasta - we've really been enjoying sabbatical so far and have had more time to try new recipes.  This one was a pizza pasta casserole for supper one night that tasted yummy.  


Friends - I am so blessed to have friends near and far that have been so supportive the last months when my husband was in the hospital.  These two cards were from 2 of my Flourishes friends, Julie Koerber and Heather Jensen.  Gorgeous work don't you think?  


Salsa Verde - Oh MY.  A little backstory here - one of my favourite things we've tasted in Mexico over all our trips for me is Salsa Verde.  Literally Green Salsa.  It is so delicious!  The Mexicans make it spicy - but not so spicy that you can't handle it.  It's made with Tomatillos which have a very unique citrusy taste to them.   Mexicans eat it with tacos, or chicken, or many other foods, and they always make it fresh.  My husband found a recipe for it the other day and he tried it out because our older son was representing Mexico in his school's culture fare this past week (and needed some authentic salsa).  It was the closest to Mexican Salsa Verde I've tasted, and I've been enjoying it ever since!  Those are authentic Mexican corn tortillas on the side too, we just cut them up, throw them in the oven and then dip them.  One of my favourite tastes this week! 


Selfie - I haven't done a selfie in a long time.  I got a new haircut and thought I'd show it off.  :)

Thanks for stopping by friends!

Friday, March 22, 2013

Hello Honey!


As I'm writing this (on Thursday - the first full day of spring), it's blizzarding here.  Again.  We've had a crazy over-abundance of snow this winter, the drifts are so high it's become hard to shovel, even for my 6 foot 3 inch husband.  So, I have to create spring in card form yet again!  But I have to say I love this one!   I stamped the honey bee skep from Flourishes Bee My Honey set onto Flourishes Classic White with Memento Tuxedo Black ink.  Then I die cut it with these great Hexagon Spellbinders MADE for  a project just like this :).  The colouring was very fun, and I have a long list of copics I used.


I paired the pretty honey scene with some papers from MME - Unforgettable, which has that awesome honeycomb pattern.  I cut out some of the honeycomb design on one of the sheets to make a border along the bottom and also to accent the top left.  Then a little teal blue seam binding, sunflower buttons and twine to make it pretty...then a wee sentiment flag stamped with Memento Teal Zeal.  The cardstock is Color Made Easy Sunflower and Emerald Coast.  


I hope my little taste of spring makes you feel the joy today!  

Thursday, March 21, 2013

Twinsies


We're back for our wrap up of the March New Releases at Flourishes today.  It's your last chance today to purchase the bundle of new releases at a discount, so we don't want you to miss out on these beauties!

I have a pair of cards from the new set Inside and Out Congrats that would be perfect for a new baby...or babies in a family, take a look.


So sweet right?  I paired the wonderful sentiment with the little booties from one of our baby sets, Hello Baby.  So cute!  I embossed the booties with VersaMark embossing with white embossing powder onto Color Made Easy Candy Pink and True Blue Collections in the lightest shade in each collection.   Then  I added a touch of depth and shading with a copic marker on each set, then I trimmed them out.  

The card is a windowed design which I'm loving lately, each one embossed differently, then stamping inside the window onto Flourishes Classic White card stock with Summer Sky Memento Ink and Ranger Spun Sugar Ink.  What I love so much about polymer stamps is that you can curve them, which I did to fit the inside of the circular window.  


For the little girl I added pretty blush pearls (even on her bootie buttons!), and some lovely pleated ribbon (here in ivory).  

Then for the boy...


He gets some cute True Blue buttons and a little iridescent string.  

Really simple, but eye catching too.  I have REALLY loved this series of stamps Inside and Out, and have had so much fun pairing them with different other sets we carry.  

So now you can head on over to the rest of the Design Team to see what March Madness they've created today too!  (can you tell we love Basketball in this family?)

Tuesday, March 19, 2013

Fuchsias


Sometimes I don't get enough time to play with releases each month, so it's always fun to bring them out again!  This was Febrary's beautiful set Old Fashioned Florals.  While my husband was in the hospital especially in the early days after surgery, he was often sleeping or drugged on morphine, I would colour while I sat with him.  So, I had this image coloured but hadn't had a chance to put it into a card yet.  Fuchias are such a pretty and unique basket flower, with so many options for colouring too.  I went with purples and pinks with this one.  

The image is stamped on Flourishes Classic White with Memento Tuxedo Black ink, die cut out with our Perfectly Pierced Classic Frames Die, and then framed out with the gorgeous Perfectly Pierced Victorian Ovals die on Flourishes Color Made Easy - Candy Pink cardstock.    Behind that framing is Bo Bunny purple cut with the Radiant Rectangles die (stunning I have to say) , and an older strip of Bo Bunny Garden Girl dp.  Doesn't the embossing look just like the fuchias?  It's a new folder from Spellbinders called Whimsical Flora.  I love how the dots in the folder go with the piercing in the dies.  


For finishing details I added some elderberry seambinding, rhinestones, and a violet rhinestone button tied with white Iridescent string.   Sorry, I don't have a list of the copics I used, as it was coloured in the hospital, and that was one thing I didn't keep track of.  Looks like some RV's and V's in there, maybe even some BV's too!  I left the design without a sentiment.  To me it just looked finished the way it was.  Sometimes cards just work out that way!